
If you’re coming from Python or another language that often makes use of Jupyter notebooks, you might have become a bit addicted to them like me. Especially when learning a new language, like Scala now, or functionality I often want to check my intermediate results when coding and Jupyter notebooks provide a visual and comfortable way to do that.
Table of Contents
- Installing Scala on Windows
- Install Jupyter Notebook
- Install a Scala kernel for your notebook: Almond
- Access Scala kernel from VSCode Notebook
- Access Scala kernel from Jupyter Notebook
- Conclusion & End Result
Installing Scala on Windows
Before we can dive deep into the Jupyter notebook setup, we need to install Scala of course.
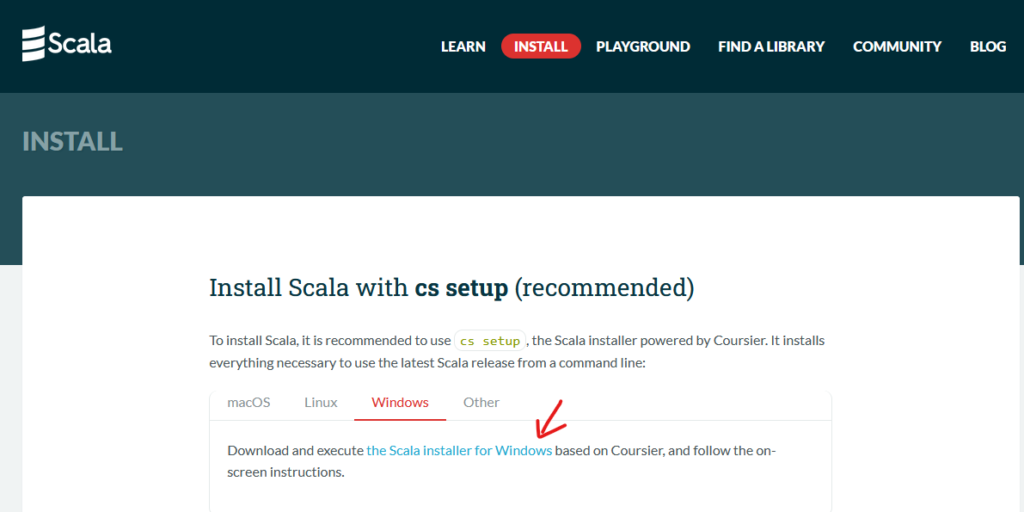
Go to the official Scala download page https://www.scala-lang.org/download/ and select to download the “Scala Installer for Windows” (at the time of writing this link points to the following, but better check for an up-to-date link: https://github.com/coursier/launchers/raw/master/cs-x86_64-pc-win32.zip) as recommended.
Unzip the downloaded archive. Double-click the application within to start it.
This opens up a terminal-like window:

In my case, I had the JVM already installed. If you don’t have that, install your preferred version of the JDK (Java Developer Kit). There are plenty of tutorials available online.
I chose to select ‘Y’ – add to path. It then downloads various JAR files for the “standard Scala applications” and installs those. After a few minutes, press “ENTER” to continue. This closes the window.
Afterwards check in your terminal-application or powershell for “scala -version” and cross your toes that it outputs something other than this:

However, if you do get this error message, don’t fret. Try logging out and back in to your Window user (worked for me), or just reboot your computer all together.
Afterwards you should see something like this:

Install Jupyter Notebook
I’ll keep this short, because chances are if you want Scala in Jupyter, you already have Jupyter somewhere installed.
You can install Jupyter stand-alone and use it in your browser (instructions for both Jupyter Notebook and JupyterLab can be found here: https://jupyter.org/).
My preferred method is to use the Jupyter Notebooks in VSCode (my IDE for everything) because it allows me to use my favorite extensions, git-settings and themes. This is possible through the “Jupyter” extension.
Install a Scala kernel for your notebook: Almond
There are different ways to get a kernel for Scala, I personally have used Almond.
On their website almond.sh, you can find installation instructions. At the time of writing these are:
> bitsadmin /transfer downloadCoursierCli https://git.io/coursier-cli "%cd%\coursier"
> bitsadmin /transfer downloadCoursierBat https://git.io/coursier-bat "%cd%\coursier.bat"
> .\coursier launch --fork almond -M almond.ScalaKernel -- --install
You can find these after clicking on “Equivalent Windows command”.
Run these commands in the command prompt, not Powershell (the latter didn’t work for me).
Afterwards, reboot to be on the safe side (or save that for when things don’t work out).
Access Scala kernel from VSCode Notebook
To now get things running, create or open a VSCode project, create a file with the ending .ipynb and open it. Then click on the kernel selection button in the upper right:

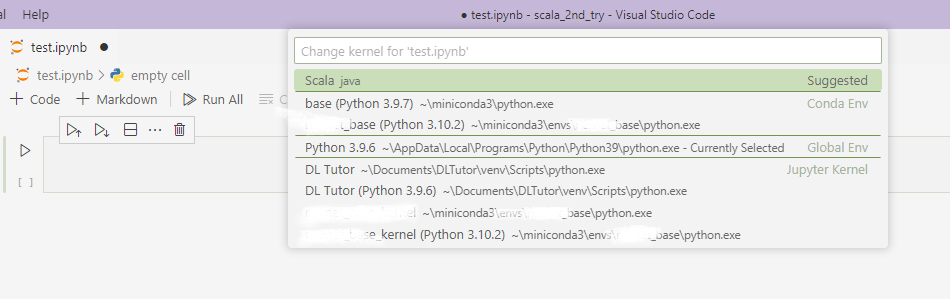
Notice how my project is called “scala_2nd_try” because I had troubleshoot my installation and thought creating a new project might help. It did not.
For me, the Scala option only appeared after updating the Python Extension in VSCode – so if you have issues with kernels not showing up, try and see if you have any pending updates before throwing your PC out of the window.
Access Scala kernel from Jupyter Notebook
This way of accessing the new Scala kernel worked immediately for me, so if you’re not into VSCode, you’re in luck probably.
Simply open Jupyter by typing jupyter notebook into your terminal of choice.
When creating a new file with the drop-down menu, you should see a new option called “Scala” in the notebook category:

Conclusion & End Result

Execute code in your notebook by pressing the Play-Button next to your cell, or using Shift+Enter or Ctrl+Enter, or however you normally do it. The result of your last line will then be shown underneath the cell like in a REPL environment.
This article fits like a hand in glove for me. That’s just I was looking for. Thank you so much because I was about to throw my PC out the window XDDD
excellent article to setup